Koi How To's
Performing a Gill Biopsy on Koi
The gills of koi are the gateway to its respiratory system. Gills absorb the water’s oxygen and release carbon dioxide, just as our lungs do with air. A bony flap called an operculum protects the gills and regulates water pressure. It acts as a one-way valve, allowing water to leave the gill chamber while blocking oxygen-deficient water from re-entry.
When to Perform a Gill Biopsy
You will typically perform a biopsy when you suspect a parasitic infection in your fish. Some symptoms your koi might exhibit include heavy respiration, lethargy, lost appetite, isolation from other fish in the pond, or fin clamping. Another concern is hyperplasia, where an irritant increases gill cells and mucus layers.
Unfortunately, many parasites are too small to spot with the naked eye. Therefore, you will need a sample of the mucus coating the gills and/or a sample of the gill filament. A biopsy is a relatively non-invasive procedure that should be done carefully and under sedation.
Equipment
You will need specialized supplies and instruments to prepare for a gill biopsy.
Treatment container
Any showing bowl or bucket will work as long as it’s tall enough to secure the fish and wide enough for it to fit comfortably.
Hospital tank
You will need to provide the koi with an area to recover after the procedure. This tank should contain at least 100 gallons of aerated water at temperatures and parameters similar to the pond.
Net
You will need a pan net, dip net, or sock net to move your koi from the pond to a transportation container. A pan net is shallow and wide, and it guides the koi without trapping it. Dip nets are similar to pan nets but deeper and more useful when koi are confined to a relatively small space. A sock net is long and cylindrical and is the only appropriate net for lifting a koi from the water.
Microscope
Use a compound microscope with an optical magnification of 10x and an objective lens of 40x. This will provide 400x magnification, which is enough to spot most parasites. You will also need to purchase clear glass microscope slides to place your samples on for viewing and cover glasses to flatten the specimen and distribute it evenly on the slide.
Treatment cradle
If you are examining koi, you will need a treatment cradle to lay the fish on while you work on it. The cradle should be soft and wet so its material does not strip the slime coat. You can purchase one, make your own, or create a makeshift work area with a wet, thick towel.
Tweezers/Scissors
You will need tweezers and scissors to hold and snip a tiny piece of gill filament. You should use the smallest pairs of each that you feel comfortable handling. Bulky tweezers and scissors risk removing too large a sample and harming the fish. However, if they’re too small for your hands, you risk slipping and causing injury.
Sedation
To conduct a gill biopsy on a koi, you must sedate it. Unlike a skin scrape, a biopsy is invasive and unsafe for a conscious fish. Tricaine-S is a licensed sedative for fish. You can also create a solution using clove oil. Follow instructions carefully, as you can harm or kill your fish if you oversedate it.
Steps to Performing Gill Biopsy
- Rinse your sedation bucket with water from the hospital tank and fill it with enough water to cover the koi. The sedation bucket should be large enough for the koi to fit comfortably but not large enough to swim around. A convenient size for this is often around 5 liters.
- Prepare the sedation solution and add it to the water, mixing it thoroughly. Some sedation options, like clove oil, do not mix well with water and must be stirred vigorously.
- Place the koi in the treatment water and wait for sedation to take effect. This usually occurs within a few minutes, and you can determine if the fish is sedated by gently lifting it or prodding its belly to check for reactivity or movement. Ensure the bucket is secured so the fish cannot jump out, and do not leave it unattended at any time.
- Once the fish is sedated, gently lift it into the treatment cradle or work area.
- If someone is assisting, have him steady the fish firmly while you open its gill cover with your finger. It’s best to have an assistant during this step; however, if you don’t have help, you can open its gill cover with your finger on the hand holding the fish.
- Lift the gill flap slightly and gently. If you handle the fish too roughly, tears may occur.
- Take a mucus sample from the gills by inserting a cotton tip under the operculum and gently swabbing the area. Hold it parallel to the cover and run it over the gill tissue from head to tail–the direction in which water flows through the gills. Do not apply pressure. A small amount of bleeding is normal and should stop quickly.
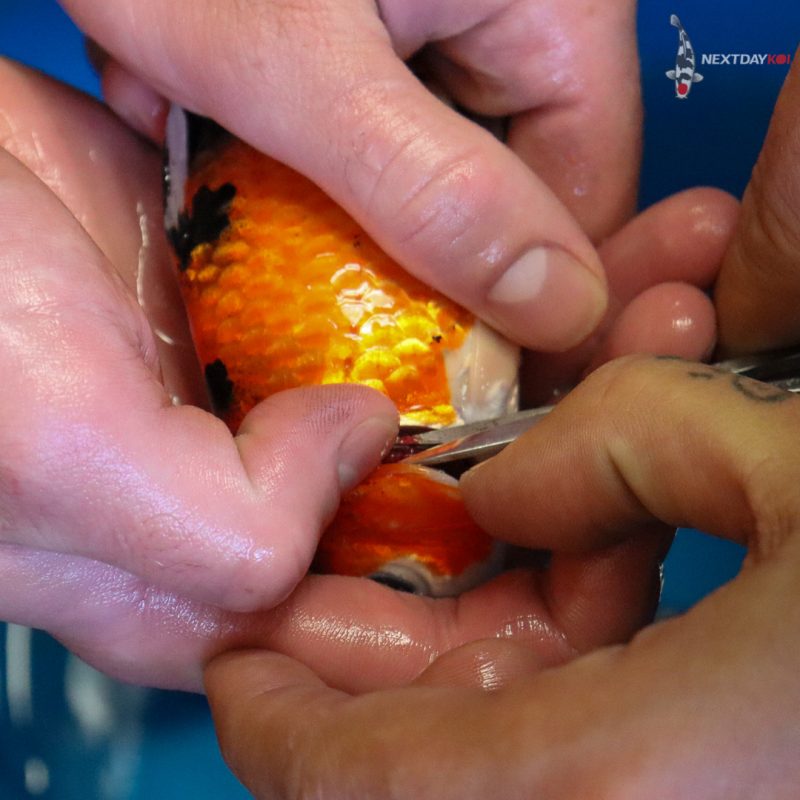
- Use tweezers to isolate a small segment of the tips from a few gill filaments and cut with scissors.
- Release the fish into the recovery tank to allow it to regain consciousness.
- Use cover glass to move the samples to the center of the slides. If there is not enough liquid, add a drop of water to the slide’s center.
- Lower the cover glass over the sample to create a smear. Press lightly with tweezers to distribute the smear between the cover glass and the slide.
- Examine the slides within five minutes of collecting the sample. After this, parasites will stop moving and become harder to detect.
What To Look For
Healthy gill tissue is deep red, so streaks of pink or pale patches may indicate a problem. Also concerning are any white edges, frayed tips, holes, or blood clots. A severe infection will produce a buildup of scar tissue. Numerous parasites and bacteria can attack the gills, but here are some of the more common problems to watch for:
- Hyperplasia: this affliction is caused by parasites that look like small white spots. A koi suffering from hyperplasia will have pale gill filaments.
- Gill disease: swelling of the gill tips is a hallmark of this bacterial infection. You also might observe what appears like “rotting chunks” on the gill, as well as a buildup of mucus.
- Gill fluke: these parasites use hooks to attach themselves to the host koi, often appearing as bubbles or small red dots. Gills that have darkened also can indicate the presence of flukes.
- Trichodina: this saucer-shaped parasite is harmless in low numbers. However, poor water quality can cause an overgrowth that the fish’s immune system cannot tackle, leading to respiratory issues.
- Chilodonella: this heart-shaped parasite contains small hairlike structures. Its slow-moving nature makes it difficult to spot in action, so be patient and observe carefully.
- Costia: this parasite is shaped like a comma and wobbles as it swims. It normally attacks unhealthy koi as a secondary infector.
Are you thinking about adding a new fish to your pond? Browse our selection of Koi and Goldfish.


